
Diamond Painting - The complete guide
So, your friend has introduced you to 5D Diamond Painting, or you're starting to see amazing images of 5D Diamond Paintings on the web, but not totally sure what's involved with diamond paintings, or how to get started. You're in luck, this comprehensive guide will take you through the origins, how to do diamond painting, tips and just about everything you could ever need to know about Diamond Paintings, all in one post.
What are Diamond Paintings?
Interestingly enough there's no 'official' date of when Diamond Paintings was started, but from all the searching on the web, I found results as far back as 2015. Diamond Paintings were designed to be an easier task and perhaps a little more relaxing than cross stitching. Similarly, it's often compared to Paint by numbers which is a method where by a canvas has numbers printed on, leaving the artist a simple paint within the numbers challenge.
Paint by numbers is also quite popular, but we find it's not quite as therapeutic and requires a little more prep / time as you need paint and the obvious set ups to make sure you don't get paint everywhere.
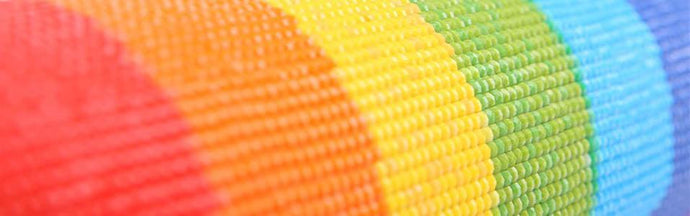
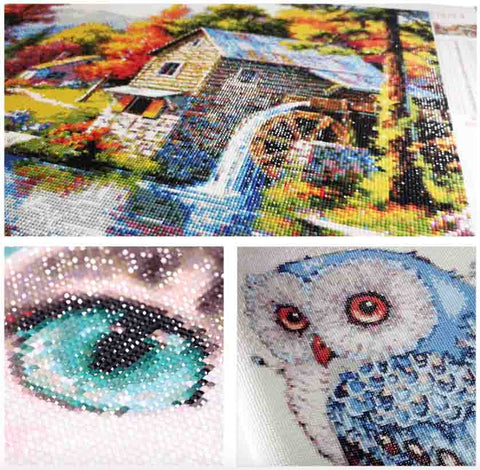
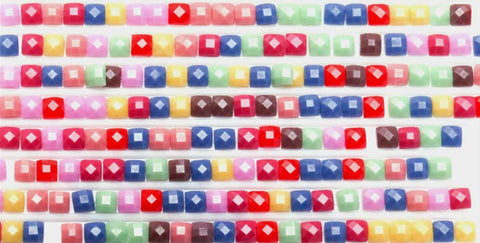
Diamond Painting is perhaps a little more simpler than the above mentioned. Why? Well, Diamond Painting is the art of applying small circular (round), or square resin 'diamonds' to a coded canvas to create an amazing mosaic type painting.
The application of the 'diamonds' is completed with a pen drill, which is simply an applicator to pickup the diamond and glue it to the adhesive of the canvas.
How to get started with Diamond Painting
To get started, you'll obviously need a Diamond Painting kit - we stock a limited niche range of really amazing diamond paintings that you are guaranteed to be proud of, and want to display on your walls, or even frame - more on that topic a little later.
If you're just starting we typically suggest starting with the round drill pieces (you'll see more about that topic later in this complete guide.) and a canvas size of either 15cm x 20cm, 20cm x 25cm or 30cm x 40cm. It's unlikely that either of these sizes are going to be the pièce de résistance in your home. However, they're the perfect size to get started, make a few mistakes along the way, but still have something small and cute at the end.
Once you've received your 5D Diamond Painting Kit, you can start to follow these basic instructions to get started!
1. Unbox your Diamond Painting kit from Painting Diamonds
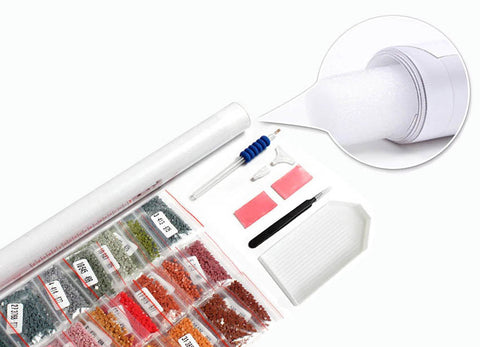
So, what should you expect to come with your diamond painting kit? Well, a whole assortment of goodies, depending on where you purchase the kit from, but it should have:
-
Rolled up canvas - the board you'll be adding the diamonds to, and maybe even framing later. When you receive your 5D Diamond Painting kit, it's going to come rolled up with all the tools and diamonds you need to create your masterpiece. Before you get started, you need to flatten out the canvas. Put a square heavy item on the canvas, you could use books, a laptop anything that has enough weight to it and has a flat surface.
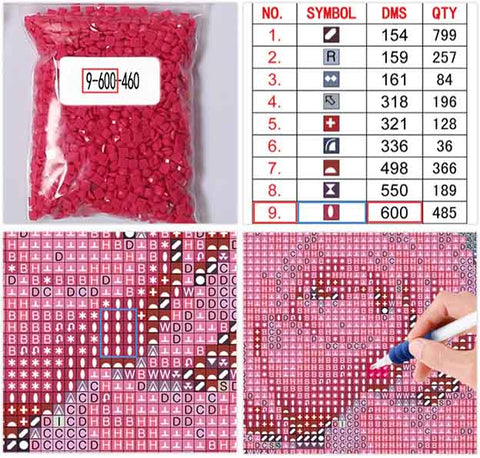
- Resin Diamonds - You should receive multiple packs of resin diamonds aka diamond drills having codes directly correlating to the canvas (So, you know where to put them)
- Pen Drill (Available in Square or Circle - depending on your purchase)
- Wax - used to pick up and apply the resin diamonds to the canvas
- Diamond Tray - use the diamond tray to hold your diamonds, and pick them up easily
2. Clean Surfaces are key
Make sure you have a clean and flat surface ready to begin the therapeutic artistic adventure. We suggest a study desk, or a table with ample space to fit all the pieces and tools required, the amount of space you need is highly dependent on the size of the canvas you've purchased, and as some of our pieces reach 100cm x 100cm, you may want to plan your space in advance.
Quick Tip - Don't try doing this on carpet or a surface that isn't sturdy. Trust us when we say this, the diamonds will go everywhere, and you're likely to pierce the canvas with the pen drill.
3. Start with one color
Pick a single color diamond and add a handful to your collector tray, for some advanced / large pieces, you may add multiple colors as you're targeting a full section at one time, with many colors.
Quick Tip - We typically recommend starting from the opposite side of your preferred hand. E.g. if you're right handed, we suggest starting from the bottom left corner of the canvas.
4. Place Diamonds in the tray
Once you've selected the diamond color you want to start with, make sure you add them to the diamond tray. When you have a handful added, be sure to give the container a gentle shake, so that the diamonds can fall into the container grooves nicely, giving you an easy way to pick-up the diamonds with the faceted side facing up.
5. Dip the tip of the Diamond Pen into the wax
The wax is used to pick up the diamond pieces, it's really key to pick the pieces the right way up. Every kit comes with a stick of wax with a little more then you should need, so don't worry too much about running out of wax as you're likely to have a little left over at the end. When you're getting started, be sure to remove the plastic film from the wax - some waxes aren't so obvious that they have a plastic film on them.
When dipping the drill pen into the wax, you'll have to make sure that it penetrates the wax entirely, filling the pen to it's maximum.
6. Pick up a diamond
Press the tip of the pen drill on the rounded side or grooved side of the diamond, the wax should help pick up the diamond, making for a strong hold to apply to your canvas
7. Place your diamond
Finally, it's time to place a diamond to the canvas, your whole life has been building to this point, and it's now time to create and enter that blissful therapeutic zone.
Before you rush ahead, be sure to gently peal back the plastic film from the canvas from one side. We don't recommend removing the plastic film until you've completed at least one half of the side, as the canvas itself has an adhesive finish, which you definitely don't want to get dust on.
When applying, make sure you place the correct diamond correlating to the canvas.
8. Repeat Steps 5 to 7
So you've successfully placed a diamond down to your canvas, well done! It's time now to keep going and enter your new happy place, one diamond at a time.
Diamond Paintings typically take anywhere from a few hours, to days of relaxation and fun ultimately depending on the size (Remember, we have canvases that are 100cm x 100cm - so it's very subjective).
Round vs Square Diamonds - what is better, and why?
So, you've seen on our website (or perhaps others) the option to purchase "Square Drill" or "Round Drill" options.
The age old debate, well - since Diamond art has been around, anyway - which is better, circle or square diamonds, which one should I buy, and why?
So, which is better round vs square? Well, the simple answer is that it depends. But wait, I'll try to explain why.
Square Drills provide a fuller, more complete looking diamond painting with less space between each diamond itself, giving it subjectively a more complete look as being square they line up more easily, giving it almost like a mosaic appearance from a distance. It's probably not going to make the world of difference when it comes to purchasing Square vs Round, however - square drills also give you a satisfying snap sound and feeling when you apply a square piece surrounded by another. You won't start to feel / hear this until you've applied a fair few down, but sometimes it's the little things in life that give you the most satisfaction.
Learn more about square vs round drills
Quick Tip - Drill is just another word for a diamond.
Round drills are much easier to apply as they stick to the diamond pen better, making it much more efficient to pick up and place down on the canvas. We typically recommend round drills for beginners, at least for the first one or two canvases as you work up in size and complexity of your canvases.
The Painting might seem a little less full then the square drills, just as between every circle there's the illusion of very small gaps. I personally wouldn't worry about this as your learning, as it's just as much fun and something you can breeze through a little easier with the round drill.
Full coverage diamond paintings
What is the difference between a full coverage diamond painting and a partial diamond painting? Well, it's quite simple. A full coverage diamond painting means that you need to cover the entire canvas with diamond drills to complete the painting. Where as, a partial kit means that part of the canvas is pre-printed and does not require you to fill the entire canvas with diamond drills.
Partial diamond paintings are less time consuming, but genuinely are viewed as less enjoyable as the reward is not as sweet, with a mostly printed finish.
Tricks of the trade
The veterans of the diamond painting trade know how satisfying it can be to create a dazzling piece of diamond artwork along the way, while being immediately in a state of trance and relaxation. It doesn't matter if you're on your first or thirtieth canvas, a few clever tricks will help you complete your diamond art piece that you'll be proud to show off.
Acquire a multi diamond application tool
Highly dependent on the canvas and complexity to the piece itself, but most pieces will have rows or sections that use the same color in quantity, there's some pretty awesome application tools that allow you to pick up multiple diamonds at one time, making the painting process quicker and more efficient than doing it one by one. Be sure to have a think about why you're completing your canvas as it's certainly not as therapeutic as completing a canvas one single diamond at a time, although it can be time consuming.
Learn more about the top diamond painting accessories
Organisation!
Save and organize your diamonds. After you've tried and completed a few sets of diamond painting kits, you'll likely have some left overs you'll want to keep. The key here is to be organized, we like using small plastic trays that have their own section / can be compartmentalized that you can pull out individually. Diamond Painting storage containers are a great option to help keep you organized.
Be organized and eco friendly!
In typical DIY fashion, an alternative is to use your left over egg cartons to separate your gems into different colors. There's just something about reusing egg cartons that we love, I think it's something to do with reusing what you have that's somewhat eco friendly, and doesn't cost any extra money - which is also nice.
Keep a clean workspace
As mentioned within this article, it's super important to keep a flat, dust free workspace, always covering your in-progress artwork as you go. It's best not to move your unfinished artwork, so try selecting a space that you can leave your artwork for the period you think it's going to take. Don't worry, if you have to move an unfinished piece, you definitely can - just be careful and try to keep the canvas as straight and flat as possible.
Depending on the size, I like to put something underneath it, I've taken some larger photo frames off the wall and placed the unfinished canvas on-top when transporting around unfinished and unframed.
We recommend checking out some purposely built Diamond Painting Lap Desks
Don't rush, have fun, learn and enjoy
Diamond Painting is truly super therapeutic, but it's also time consuming - don't rush your artwork, give it the time and enjoy the relaxing process to the fullest, learn new tricks and techniques along the way that add to the experience.
And most of all, enjoy what you create at the end by framing and hanging it up on the wall for everyone to see!
Hopefully we've given you all the info and tools to get started in this super stress-relieving and wonderful world of DIY Diamond Painting. We're always excited to talk Diamond Painting, so don't hesitate in asking us any questions at hello@mypaintingdiamonds.com
Have a question or want to continue the conversation, leave a comment below!


Nancye Evans
I am very interested in your words on Diamond Painting – I have been doing bits and pieces for some weeks now, and I am really “hooked”. Not the paintings as much as the Note Books, Pencil Cases, and Key rings. I am doing individual items such as the key rings as a Christmas Tree decoration for my bounty of Great grandchildren and others too. I am so pleased with these results, and finding them hard to get – do you stock these,? I need more.. Please say yes. I am not a youngster – I am a resident in an Aged Care Facility, and I find that using my brain is so essential to keep an active mind – therefor your Diamond Printing is an ideal occupation. I do wait for your response -—Nan Evans.